
Periodic time interval
When a new record comes in
When a specific condition is reached in the database
Periodic time interval where a specific condition is true
When a new record comes where a specific condition is true
The last record
All Records
The record that triggered this message
This data can be constrained to where specific conditions are true
Plaintext message (best for SMS, email, etc.)
JSON
CSV
TSV
CBOR
BSON
Below are all the different types of input and output connectors.
If you are interested in specific examples see the wiki sidebar
under "Output Connectors", you will see some examples.
Uses the HTTP REST protocol and POST method to send data to a remote location.
HTTPS is a more secure version of HTTP that encrypts your data. Your remote device must allow traffic on port 80 for HTTP Output Connectors and port 443 for HTTPS Output Connectors
HTTP has less security, however you still have the option to attach credentials to the request.
HTTPS has the option for secure transfer as well as the option to attach credentials to the request.
The URL must be remotely accessible by RLD
The URL doesn't need to include the protocol at the beginning, it will be added based on your selection as described above.
TLS is only applicable to HTTPS connections. There are 3 options.
No Security: Use this if you don't care about RLD checking the HTTPS certificate of the remote server
Secure: Use this if you want RLD to check the HTTPS certificate of the remote server against a standard bank of certificates
CA: Use this if your remote server is using a self-signed or obscure certificate signing authority.
For the majority of users, No Security or Secure will suffice.
These are the credentials that will be used when doing the POST call. These can be:
Basic Authentication: username and password
Certificate and private key authentication
Both of these creds can be created in the "Credentials" tab.
Uses the HTTP REST protocol and GET method to allow outside users to retrieve data from your RLD project.
HTTPS is a more secure version of HTTP that encrypts your data.
RLD requires you to query this Output Connector with HTTPS, if you use a browser and HTTP your connection will be upgraded to HTTPS.
This URL is what you will use to access the data defined by this Output Connector
Auto
Use this if you don't know what you're doing.
The "Auto" option will automatically generate an endpoint for you. This endpoint is meant to be long and difficult to guess in order to protect your Output Connector and project data.
In order to test you can copy and paste this directly into your browser and it should show a json object response.
Endpoint
Use this if you know what you're doing.
The "Endpoint" option allows you to specify your own endpoint. For example if you enter "test" as the endpoint the url will be something like "https://oc.reallifedata.net/32/oc/test", however it will be specific to your RLD project.
All Endpoints in a project MUST BE UNIQUE, you cannot make multiple endpoints with the same name in a single project.
If you use this option, you will have to select a username + password credential to protect the endpoint from spam. To then authenticate you will have to make HTTP GET requests using Basic Auth in conjunction with the username + password you configured.
HTTP Pull output connectors can allow you to adjust the data you want to query when you make a request to the endpoint. For example let's say you have the endpoint "https://oc.reallifedata.net/32/oc/test" and you want to only get records where the "Score" is 42. You can instead query "https://oc.reallifedata.net/32/oc/test?Score=42".
Keep in mind this additional constraint is applied at the very end, so if you have any other constraints on your output connector you'll still be limited to what data you can query. This feature can be used as a form of access control by constraining the output connector to only serve accessible data, and then allowing users to constrain the data even more.
These are the credentials that must be passed when doing a GET call to this endpoint.
These can be created in the "Credentials" tab.
Uses the MQTT protocol to connect to an MQTT broker and publish data to the given topic.
This is the URL for the broker that we are connecting to.
This is the topic that your Output Connector will publish to, allowing the broker to send data to any subscribed clients on that same topic.
Tags
We can create topic tags by using '<>'.
<device\_id>/sensors (which may look like a47gh82nj1n/sensors for one of the sensors).<device\_id>/sensors into the "Topic" field
This can be used to securely identify data from RLD to your MQTT broker. These can be:
Basic Authentication: username and password
Certificate and private key authentication
The option you use is usually dictated by the broker provider you are using. If you are using a free public broker, you usually don't need any form of authentication.
Both of these creds can be created in the "Credentials" tab.
This is the public certificate for the MQTT broker you are connecting to. This is often only used on brokers that require authentication via public + private keys, but heavily depends on your broker.
Sets up notifications that will be visible to all authors in the RLD project. These notifications can be seen in the top right corner when one is logged in on their RLD creator account.

The notifications should look something like this:
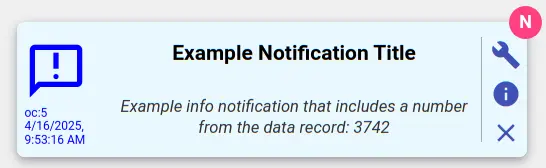
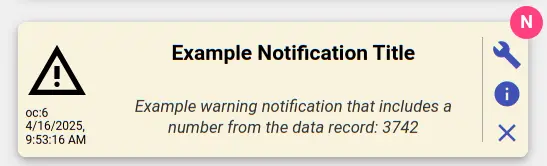
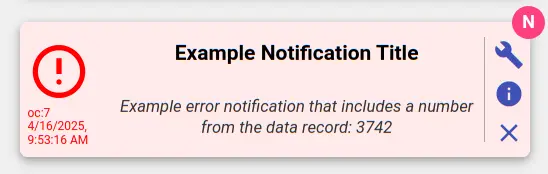
Title
Description
Types
Info: this is a basic notification and it shows up blue. It is meant to give information to the creator of the project
Warn: this is a warning and it shows up yellow. It is meant to be used when there is an issue potentially arising in your system
Error: this is used to show serious errors in your system, it shows up red.

Sends custom messages to the given email address(es). These emails can include
BCC and CC email recipients
Data from your database
Custom subject
This is the email address(es) your outcon will send updates to. Emails will come from a '@reallifedata.net' email, and will include your email at the bottom. You can add multiple recipients and choose whether they should be CC/BCC or neither.
Your output includes:
Subject: the subject line for the email that will be visible to users on their email manager of choice
Description: a combination of
Sends text messages about your data.
This is the phone number your outcon will text updates to. When entering a phone number, make sure to include the country and area code. For example, for a U.S. number, don't enter 512-123-3232, but enter +15121233232.

Your message output can include preformatted text as well as field tokens that will put data from your database into the message. Below you can see a gif of this in action:
 Wiki
Wiki